The Esssence – Doug Tasgold’s C&S

For years, I’ve studied the SR&RL, and dreamed an exacting representation. But as life continues, and I lack a layout, one has to wonder how exact one needs. My introduction to the Maine 2-Footers came from HOn30 C&DR of Bob Hayden and Dave Frary. That layout had very little exacting Maine 2-Foot prototype in it. The C&DR is more fantasy than realism. It hints at the Maine 2-Footers but fails to be in anyway accurate. It’s artwork with limited historic accuracy.

Jack Burgess was one of my model railroad heros. His Yosemite Valley railroad is exacting to prototype it is very perfecting. The YV inspired me to believing I could try the same for the SR&RL. But after years, I’m not sure that aspiring to a Jack Burgess Sn2 SR&RL will ever happen. Aiming beyond my abilities and time is getting in the way of having a layout.

Then comes along Doug Tasgold’s and his C&S. It clearly rooted in the C&S up the Clear Creek, but it’s exacting. Visitors can feel the history and learn about the C&S of 1929. But Doug, one of the hobby’s most prolific layout builders, did not let exacting hold him back. His trackplan is prototypical, his equipment looks the part, his scenery is fantastic, and his operations are captivating. However, accepted compromise and used uses illusion in achieving his objectives and to achieve it in a lifetime (actually just 5 years or so).

Doug’s layout gives me hope that I can move forward on the Sn2 SR&RL, or at least I should give 2022 to try moving forward! If Doug can use HO track and equipment for 1:72n3, then I could be OK with a Blackstone K27 or Blackstone trucks or some other compromises…

(As of January, the video has over 1K views! Consider liking it if you take a look, I’m curious how many views It can get too!)

Posted in Comentary, Layout Tours | 2 Comments

On2 Al….Comes for a visit

This past weekend, Al Churella was in town, and stopped by for a few hours. I’d hoped to share great progress on the Sn2 SR&RL. But alas not enough time in life. Instead I put my efforts into the Woodlark Central for outdoor railroading fun….

Al did take a look at the Sn2 SR&RL, and approve what I’m doing. He was impressed that I’d wound the so much of the SR&RL into such a modest space. Prior to his arrival, I did arrange the room (cleaned out the excess…most excessive…stuff) so that he could get a feel of the room…

I did not get any photos of Al in the basement. But here is a shot of him at running a train on the Woodlark Central. Click on the photo or this link to see the 2021 Cicada Run. Video included.

https://oneinchscale.wordpress.com/2021/06/09/cicada-run-2021/
Posted in Comentary, Visitors | Leave a comment

Track plan completed

Till now, I’ve been working with concept diagrams of the layout. The concepts were good to work out grades and get an idea of what would fit into the room. However, they were not sufficient to describe the railroad to others.

For the past month I’ve focused on finalizing the plan so that I could share it on a zoom call and to make it a better aid in building the layout.

This post is to announce that it’s available on a track plan page: Track plan | Sn2 Modeler

I decided to make a page so that visitors would find it easier to find the track plan.

Take a look and ask questions. The plan is not 100% complete. Mostly on the F&M/K&DR between Kingfield and Bigelow. Additionally, I’ve not added scenic details, bridges, structures. Maybe in the heat of summer I’ll take that on. But in the near term, back to building.

I’m going to be focusing the next 1-2 years on the P&R segment. More in future posts.

Posted in Current Layout, Drawings and Plans, Layout Design, Layouts | 3 Comments

SR&RL Size Perspective

Denis, a local friend who does narrow gauge live steam and dabbles in On30, has started following my blog. He has a keen interest for the two-footers so my version of the SR&RL intrigues him.

Last week he send me the map below that has the SR&RL overlaid on a map of South West Ohio. He put Farmington at the mouth of the Little Miami River as it flows into the Ohio River, so that the SR&RL reaches north toward Dayton and Columbus. This placement parallels the real Little Miami Railroad that later become the PRR’s access to Cincinnati. Denis pointed out that Strong would be at Milford OH. Today it’s a 10 mile bike ride through several communities to get from the mouth of the Little Miami to Milford just beyond the I-275 loop…. Phillips would be near Kings Island Amusement Park and Rangeley would be nearer to Dayton. I’d get to Dayton by highway and it would take 45 minutes at 60+ miles an hour!

To think that SR&RL’s little 2-foot train ran that far is bizarre or comical or mighty.

SR&RL in Red overlaid on a map of Southwest Ohio

A friend of mine models the B&O from Cincinnati to Chillicothe in N-scale. His layout represents 91 miles division. If we made the SR&RL linear, it would reach nearly to Chillicothe. He’s modeling in N-scale and I’m model in S-scale….We both have nolix designs, but I’m compressing and omitting locations much more then he.

Denis also provided a full Ohio overlay. It is not as impressive as the SW Ohio version above.

SR&RL Overlaid on Ohio map

Denis, thanks for the perspective….The maps clearly show that the SR&RL was large. Makes me proud of the railroad that I’m modeling!

Posted in Comentary | 4 Comments

Farmington Planning – Part 1

I’m making a push to formalize the track plan sufficiently to explain it to others. Farmington became the starting point. I had worked out Farmington on the floor and now transferring those thoughts into the 2D plan.

Here are the druthers for my version of Farmington

  • Upper, Middle & Lower Yards – The upper yards is the north portion of Farmington, the primary transfer yard which mostly transferred lumber and cordwood from the SR&RL to the MEC. The middle yard does not seem to have a clear purpose. I think of it as overflow and coal transfer to SR&RL cars. The lower yards is the location of the depot, MEC freight house and transfer sheds, and the SR&RL turntable.
  • MEC Depot (can be 1/2 against backdrop)
  • MEC Freight house and transfer shed for LCL freight (I presume that much SR&RL outbound wood products became LCL freight on MEC)
  • SR&RL Passenger Canopy
  • SR&RL Turntable
  • MEC track in such a way it can be operated. The hope is to operate the MEC during an operating session.
  • Sufficient room behind the SR&RL tracks for scenery and structures that give the impression of the hill and town of Farmington behind.
  • Prototype track layout capable of simulating SR&RL operations. I presume there were time when the SR&RL switcher, a freight train, and a passenger train were all in Farmington at one time. This means there needs to be sufficient room to get the freight out of the way for the passenger train to the depot and out again.
  • I would like 10 car freight trains to Farmington, so one siding must handle such sized trains and other track might need to handle additional cars while other are at the transfer tracks. A five foot siding could hold 10 cars without engine. I think it is acceptable to think the engine could be at the turntable or on another track.
  • SR&RL coal dock/trestle upper yard.
  • Russel box shop
Farmington – The red lines are MEC standard Gauge. The orange lines below are my modeling bench, sink, and storage cabinet. The layout goes over the modeling bench on two decks (the lower is very narrow) and goes to Salem on it’s way from Strong to Kingfield. Behind Farmington is the mushroom aisle for Eustis and Rangeley. One walks around the end of Farmington to enter the mushroom aisle.

Reviewing the design

The design captures most of my desires. Here are a few points in review.

  • Aisle is mostly 3′ or more wide. That is minimum as operators will be passing each other, and I will be sitting at the modeling bench working on my computer and models.
  • Compromise – The SR&RL turntable does not quite meet the 3′ aisle width. As such teh last 4-6 inches of scenery will fold down (even under the turntable). Thus when not operated I’ll fold that down and under the layout, and turn the Turntable to the side (or remove it too). In this way, I’ll not hit it while working around the model bench (the bench is more of a long 32″ high counter)
  • The MEC depot will probably get sliced in half
  • The MEC freight house will be stubbed into the side backdrop
  • 10 car trains will swamp the yard, but I think it will be manageable. Yard will fill when a train arrives, but if it takes 10 cars away immediately, the switcher can take over an deliver all of the cars as required. 30 cars a day into Farmington should make for good operations.
  • 6-8 standard gauge cars can be moved around the yard. I might add a casset through the side drop, so the MEC can bring cars on and off the layout. The other option would be to have them come on/off the layout same as the prototype.
  • The MEC track is compromised to make it operable. I think operation would be more fun than seeing exact prototype scenery. I think crews will love switching with the larger standard gauge cars and locomotive (4-6-0 or 2-8-0 or 2-6-0).

Overall, I’m sufficiently satisfied that a workable Farmington Yard can be built in my slim space. At a future time, I’ll add more detail such as buildings and trees to the design.

Posted in Farmington, Layout Design | 2 Comments

Progress – Locking in the roadbed and Spline for first turnout

At the end of February, I worked to locate the first turnout. The first one is the turnout at south end of Reeds to the Reeds Mill(s). This is south of the Reeds depot, and is the turnout before crossing over the “highway” in Reeds. The spur branched to the west, running along the road and then crossing over it to reach close to the mill(s). I keep writing “mill(s)” because there was more than one mill at Reeds. It’s not clear to me if the mill(s) generated lumber or mostly cordwood and/or pulpwood. More research is required.

This spur is important to me at this time, because it is to be the first turnout on the layout. The plan is to install the turnout and then lay track back toward Madrid. Once the track is in place I plan to run a few grade tests to ensure that this grand Sn2 layout is doable.

Another happening the past two weeks is that I decided lock (screw) the roadbed into the benchwork, abandoning the free-floating spline. This is for two reasons: 1) The roadbed continued to shift 2) the roadbed rocked/rotated. Neither situation seemed good for a stable operation.

Here are a few photo highlights from the past few weeks.

To anchor the roadbed to the brackets, I glued plywood horizontally to the brackets to form a “L”. The plywood was pre-drilled with 2-3 holes. Once the glue dried, I screwed vertically in to the spline to stabilize the roadbed.

Here is the spline for the spur to Reeds Mill(s). The spline for the spur is screwed to he side of the mainline spline.  The mainline is on a steady 1/7% upgrade.  The spur is close to level.  Oberton creek was just to the left of the railroad grade and spur.

The layout need to be wider than 16″ to support the spur in a realistic manner, so I extended the benchwork 4-6″. The extensions are glued on to the existing brackets. I notched the extensions by 3/8-1/2″ so that the grade of the spur would be level (the brackets are installed for the 1.7% mainline grade).


Posted in Layout Construction, Reeds | Leave a comment

Starting homasote spline roadbed (rather than foam board)

Last week I started putting in the “brackets” and roadbed under the new roadbed.  This supports from Madrid to Perham Junction and back up the Barnjam branch.  I will not go into the details of the design.  That is for another post, this one is more about the choice of homasote spline for the roadbed.

First of all, I really like foam as a roadbed support.  I was part of the Eastern Loggers, one (if not the) first Foam layouts.  Click here to see the layout design.  To my knowledge the techniques were developed by John Burchnall back in 1980 or so.  He never published an article, but did give many clinics at NMRA Conventions, Regionals, and Shows.  As a kid (14-20 years old), using my Eastern Loggers experience, I build small layouts with foam including extruded foam.  None of those layout got beyond grading but foam is my experience.  Bill Darnaby made foam based construction mainstream when he used extruded foam to build  his large Maumee layout and then wrote about it in MR (two articles).  MR staff and others went on to build layouts and write about them. It’s my understanding that John’s clinics inspired Bill Darnaby to try foam construction.  There was also a fellow who built an 100% foam HOn3 4×8′ layout and displayed it at conventions and shows.  He had products for foam construction.  (as a narrow gauge enthusiast I liked his layout).  I used foam on the sections of my first SR&RL layout and expected to for this too even though my layout design is a complicated nolix with mushroom.  Bill Darnaby’s layout is a nolix as is the n-scale B&O Chillicothe sub built by my friend Paul.   My thinking…If they could do it…why no me?

However, as construction started I got concerned about a few things.  Frist of all, using extruded foam was making it to complicated to ensure smooth grades through the curves.  This Sn2 SR&RL has 1.7% grades and if I accidentally go much higher than that, the finicky forney’s may come to a halt.  Secondly, I got concerned that the foam would not contour properly through the corners.  Finally, what roadbed would I use?  Cascade Roadbed, the most recent producers of milled homasote roadbed, has closed business.  There are other products I could use for roadbed and I could cookie cutter something.

Given my concerns, I’ve decided to try homasote spline.

I first became aware of homasote spline from Allen McClelland’s V&O layout (visit and articles) and layouts built by others who have been on his work crews (Gerry Albers is one local modeler who uses it on his VGN layout).  I’ve become aware that there are multiple spline techniques.  A MRH article describes a few different spline construction types/materials and their pro’s and cons.  Review it if you want to know about the other techniques.  I’m choosing to try Homasote splines for the following reasons:

  1. No need to add roadbed (cork or homasote) to the top
  2. Screws together with drywall screws, no glue required
  3. Will hold spikes for hand laid track
  4. Homasote is available in my local Home Depot and possibly Lowes (look for it with insulation as it is sound insulation)
  5. Can be thin enough for multi-deck (Jeff Ott has used it to build a huge Mussaubi Range GN layout with multiple decks.  He is/was a real railroad track specialist)

I’m not aware of published articles on homasote spline but I’m sure there are some.  To learn about the construction, I watched Matt Goodman’s youtube videos.  He has several videos that show and describe the construction on his layout.

  • Homasote Spline Cutting Fixture
  • Layout Update 5 – The last half shows some completed roadbed, and the stops.  The roadbed rests directly on the roadbed
  • Layout Update 6 – Shows the first run, but also shows constructed roadbed, double tracking.  It also shows him fitting foam around the roadbed
  • Layout Update 7 – Shows him constructing roadbed
  • Layout Update 8 – Spine Painting and Off-Layout Assembly – Shows him build roadbed off-layout with a jig and adding it to the layout.  You see him driving screws, marking where they are.  So simple.
  • Layout Update 13 – Bypass Construction
  • More videos – Matt has many more videos that show construction.  Just look as his Layout Updates on Matt’s YouTube channel.

At this time, I’m trying the screw together technique.  I’m starting with the section of the layout from Madrid to Eustis.  Part of it is hidden track under Barnjam branch, so could not be built of foam anyway.  I figure I have nothing to loose.  If it does not workout I can revert to foam based roadbed.

For Sn2, I plan to use three 1/2″ homasote strips to form the roadbed.  It’s a bit wider than I want.  I’m plan to use a knife to shave the edge at 45-60 degrees to represent the slope of the roadbed as seen on Mainline railroads and yes the SR&RL.  The SR&RL did all it could to keep it’s track dry and above ground level.  Maine winters were harsh and I presume the the freeze and thaw cycles played havoc on any roadbed at ground level.

Here are a few photos showing the start of brackets and roadbed.

The brackets extending from the wall. They are 1/2″ (nominal) plywood and stick out 16″ from the backdrop. At the sink it narrows to 10″. The grade coming up from Madrid is roughly 1.7%. I do not put in every bracket, instead I put one in every 3-4 feet. This is because there is a 1/8″ tolerance on the height as I install them, by filling in later brackets after the roadbed is in I reduce the chances of a sawtooth support.

Here is the first homasote spline from Madrid toward Reeds. This will all be hidden under Barnjam branch mill site. This is 1.7% grade.  You can see where I cam back and added the intermediate brackets.  I’ve not yet determined how I’ll support the corner.

Forming the curve. I cut plywood to 36″ radius on inside and outside to use as a form. The form is clamped to the spline to form a curve. Then spline is screwed together with drywall screws. The spline here is 4 wide. The extra width was added to space the masonite protector a finger width width away. The masonite protects will keep the rolling stock from falling off the back should a derailment occur. The front will be protected too, possibly with acrylic or 3″ foam extension forward. That way I can get my hands in and re-rail cars if needed.

Posted in Comentary, Current Layout, Layout Construction | 1 Comment

2020 Wrapup

2020 has ended with lots of action here on the web site.  For 10 or so years, I’d been wandering in the hobby.  No rudder.  I would dream of S, Sn3, and Sn2…Even HO and more.  These wanderings resulted in more dreaming and failed to deliver on a model railroad.  Over that time, I did help others with their layouts and operations.  Built my own back yard ride on railroad  with my Father.  Additionally I’m engaged with local modelers on an HO Free-mo style layout.  Don’t forget I was the father of a young boy and have a career managing a team of software developers.  So I have plenty of valid reasons for not having a layout.  But the wanderings let to lots of facebook and youtube time rather than modeling.

In October I put the excuses aside.  I got focused on the Sn2 SR&RL.  To invigorate my 2-foot enthusiasm, I spent a week watching 2-foot videos (rather than modern Diesels or how to videos).  Specifically, I watched videos of the 2020 WW&F  Grand Reunion.  These videos really got my juices flowing.  There it was SR&RL #6 pulling trains in HD with full sound and color!  That video directly translated to my SR&RL…Or maybe it was this Day Zero video…who cares what video it was.  There are many great videos of the Grand Reunion.  Just search, watch and then watch again….Then listen to them while you work or do email or blog (as I’m doing now)…These videos get the juices flowing.  I’m going to the next Grand Reunion if I can!

Another change I made was to start interacting directly with other like minded modelers.  I’ve been reaching out and making the connections.  This has led to good discussions, inspiration and comradery that one does not get from youtube, blogs or even groups.io.  Add these to a weekly modeler’s zoom with the local HAVOC group and I have the fuel that has propelled the end of this year!  If you do not have connections reach out to people, not just like modelers but any modelers.  Give and Take!  It’s kind of like dating without emotional stresses!

Lastly, life has changed.  My son is now 16.  He needs me less and less.  Better to put my efforts into me, my health, my hobbies, my career than watch over him.  COVID-19 has not been brought me down.  I’m sorry to those of you it has been a challenge!  I’m blessed that work continues nearly as before, except I work from home.  Working from home has given me more time at home to work on myself rather than an hour each day in the car.  I hope my work has changed for the future.  I do miss seeing my parents and going into their home.  At age 86, they are playing it safe.  I’ve missed going to train shows and op-sessions.  I’m now doing monthly operating session on a layout in Canada.  Yes, I fire up my Proto-Throttle and run modern Diesels while the layout owner conducts and works as the brakeman.  These remote ops are cool and I might look to make some parts of my layout “remote-able”.

As you’ve noticed, serious efforts went into the layout as 2020 came to an end.  Here are a few of the posts for those that are new to this blog:

I’ve had fun reminiscing through photos of my old layouts.  They are nestogic to me and motivating to get that feel back.  The layouts were joyful…Working on the layout, running them, just seeming what I built and reflecting.  I’ve missed such feelings and I’m highly motivated to get that back.

I’ve found more photos of Layout #3.  Many from the operating session hosted for the 2005 NMRA National Convention.  Look for a future post.

Finally, I’ve made posts about the layouts of my two-foot modeling friends

If you’ve read this far, thanks!  I appreciate all of you even if there are only a few.  I’ve added a link in the right so that you can subscribe by email.

In 2021, I look forward to a great year of model railroading and friendship.  I’ll report on it here.  I expect you’ll read about:

  • Completed backdrops
  • Roadbed installations and then trackwork (30-50% of layout)
  • Limited operations on a few locations
  • Grades, track tuning, and equipment tuning
  • Turnouts and other track considerations
  • Completed mushroom benchwork and more construction
  • LED lighting installations
  • Prototype, track layout, and scene design choices
  • A more detailed track plan as it comes to life
  • Drop downs, lift ups, and lift outs.
  • Setting up Sn2 Free-mo with others and other model train road trips!

I’m sure there will be more I write about and hopefully not less!  Thanks for joining me in 2020 and I look forward to bring more to you in 2021!

Thanks to all my model railroad friends!  Thanks to my family!


Posted in Comentary | Leave a comment

Harry decides to flip decks on his Sn2 SR&RL

A while back I designed a version of Farmington for Harry Downey. Recently he and I have been corresponding about the decks on his SR&RL layout.  As these discussions have progressed Harry has decided to flips his top deck for his lower deck.  Moving Kingfield and Bigelow to the top while Phillips and Rangeley get demoted to the lower deck.  He can do this because of his construction and because he’s not yet connected the decks.

Here are a few concept diagrams to show you Harry’s situation and you can watch a youtube video of Harry explaining his efforts.

Harry’s Kingfield deck. This was his lower deck. Notice the door at left. Would require him to crawl into the room. Raising Kingfield to the top deck makes it a 60″ nod under.

The middle deck is Strong an Farmington. This is a concept I proposed to Harry, to have all the circling around the with multiple tracks visible. Harry had been calling this the Helix Room. Is original plan was for a 4 loop no-lix to get from Kingfield deck up to Phillips. In the end, we each concluded that the distance between decks would be only 5-7″, to small to view. Hence I made this proposal for “helix room”

The Phillips deck. This is the concept for Phillips to Rangeley. Notice that it does not cross the door so makes sense as the bottom deck.

After reviewing the concepts and talking with Tom Sullivan, Harry is now planning for a lift.  Lifts are reasonable to consider when trains are short 4-6 actual feet.  They can actually be lifted by a human as Tom is currently planning to do.  I even posted a video showing how easy a human powered lift can be.  Harry has rejected the unguided human lift, so is still working out the details of a human power lift with constraints.

Here are the concepts of how the lift might fit into the room.  The lift itself when at the top position (Kingfield deck…now that it is to be the top)  will allow a human to walk into the Lift Room (new name for the Helix room) to walk under the lift.  Strong still requires a lift up to allow operators to pass by too.

The concept diagram for the top deck, Kingfield level.

Middle, Strong to Farmington Deck. The lift has tracks entering from both sides and there would be a lift up just north of Strong as tracks go north to Phillips, enter the lift, and get lowered to Phillips.

Bottom deck, Phillips to Rangeley.

As of 1/2/21 Harry is process of swapping the upper and lower decks.  I look forward to seeing how he progresses in 2021!


Posted in Layout Design | 1 Comment

Phillips planning

I started putting up backdrop last week with the goal to complete the upper level backdrop around the room by the end of this weekend.   Before the backdrop can go up, I needed locate a few key elements which required refining the conceptual plan.

One of the more complicated locations of the layout is Phillips.  It is complicated because Phillips itself is complicated and because the room complexities.  I’ve allocated 25′ for Phillips, but it must bend under the stairs and past the entrance door to the railroad.  Both ends of the 25′ must turn around walls.

Above is the conceptual diagram of Phillips. The complexities stairs and entrance are apparent. I used the stairs to my advantage to bend the layout in as the prototype bends. The diagram shows the refined locations for Salmon Hole and Covered bridges.

There are several key refinements I wanted to locate.

  • Salmon Hole Bridge, as backdrop and layout support must be lower at the bridge.  I had been struggling if the bridge should be parallel to the wall as shown or angled in the corner.  In the end, I chose parallel to the wall.  The benefit is it will make it seem further from Strong to Phillips but the disappointment is that the siding in front of the toothpick mill will be shorter, too short to hold a train and I loose the long fill between bridge and mill.
  • Backdrop directly under the stairs.  The stairs are outside the room, but the layout goes under them.  The backdrop will not be full height below the stairs, the higher the backdrop, the more Phillips must extend out into the room.  To far into the room impacts isle space and can conflict with Kingfield and the winter store.
  • The Phillips covered bride had to be located for support and lower backdrop requirements.

Here is the 1916 ICC map for Phillips main yard and that was my primary focus to mockup.

Phillips ICC map.  The covered bridge as at the far right.  The bend in Phillip is great for an inside corner of a room, or in my case an outside corner so I can operate from the west side of the tracks as works best for most other locations on the SR&RL, specifically Strong and Farmington.

While one can work everything out in CAD, that does not prove that it will work to the eye.   To satisfy my need for visual comfort I reviewed images of my old layouts (reused the same Phillips sections) and mocked it up in place.

Here’s the old layout.  The sections no longer exist the standards were tighter than I wanted on my future layouts (one I’m building now 15 years later).

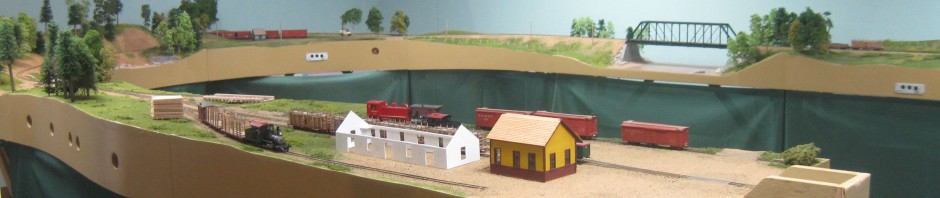
Taken during a 2005 NMRA National Convention ops session, this image shows the South end of Phillips yard. This simple layout fit on two 5 foot long sections and operated just fine. This version of Phillips had #6 turnouts and 32″ minimum radius. Hopefully even with #8 turnouts and 36″ minimum radius I can capture this same simple feel.

Here is the far end of the yard, again during a 2005 NMRA Convention ops session. The turntable and engine house never got built, but they would fit. The yard kept one operator active all night.  This image shows how easy it was capture the feeling of Phillips even after omitting some of the lesser aspects.

Here is the mockup for the new layout.  Simply laid out with foam.

Phillips mockup. The first track track to the left is the Brayman track and the second goes to the turntable. The board represents the turntable and that is followed by a cutout of the Kingfield engine house (sufficient visual substitute). The rest of the yard bends to the right.

Close up of the turntable location and engine house. The yard turns off behind. The track to Wilbur store will just curve around the backdrop support. The yard would continue onto the second piece of foam and onto the Covered Bridge. The mockup for the Covered Bridge can be seen in the distance.  The curves are laid out using fast tracks sweep sticks

Al Churella and I have discussed operations in Phillips.  On his layout he indicates that the Brayman track was probably used for sorting cars.  Ever since that conversation I’ve hoped to include it on my layout.  The Brayman track track was quite long, mine might only be 2-3 feet long, but just that short length will be useable to sort cars and build trains.  Similarly, I think the Wilbur track was used for sorting cars.

The Fast Tracks sweep sticks are great for laying out track.  They are designed to fit between the rails of flex track to hold that track at a specific radius.   I bought a bunch of 36″ radius (my minimum radius) so that I could assemble a 180 degree curve (required for the peninsula.  Additionally, I purchased a couple 32″ and 34″ radius just in case I need a tighter radius.  Even better I got some larger radius that I can use for easements.

What I find best about the sweeps is holding them up to see what curve will fit in a specific space.  I also plan to hold them up as I bend roadbed to make sure I do not put in kinks or make the roadbed too tight.  I think they are worth the cost.

Here’s a link to HOn3 36″ sweeps or Sn2 36″ sweeps.  The only difference is the laser cut letter.  Click around to find the sweeps that are right for you.  They come in various scales and gauges.

Phillips will extend beyond the entrance. You can see the turnout for Brayman track. The points on that turnout will be on a fixed portion of the layout. 6-12″ beyond the points will be a drop down. The door is 36″ and I hope to have 30″ for the drop down. This mockup proves that should be possible.

Phillips will cross the entrance.  I expect 1/3 will be fixed and 2/3 will be a 30″ drop down.  The drop down will be 8″ wide and contain scenery.  Most of the time, the drop under will be fixed in the up position.  This will result in a 50-52″ clearance duck under.  That is plenty for me do duck and swoop under.  I’m hoping the clearance will be be a more like 40″ wide, rather than the 30″ of the drop down.  I find the wider the duck under the easier it is to swoop under rapidly. The lower deck will also pass under this area.  It will have a lift up, which  will most often be up, and only lowered for trains crossing.

I could go on and on about Phillips and my thoughts to model it.  But this was enough analysis for the installation of the backdrop.   Enough diversion, I need to get back to working on the actual installation!


Posted in Current Layout, Layout Construction, Layout Design, Phillips | 3 Comments